Bridge: Visualisation of the four hands provides simple answers

Roula Khalaf, Editor of the FT, selects her favourite stories in this weekly newsletter.
All involved in the deal should strive to remember the auction. It forms the backdrop against which you infer and deduce to form a picture of your partner’s and (in defence) declarer’s hand.
Bidding
Dealer: East
Game All
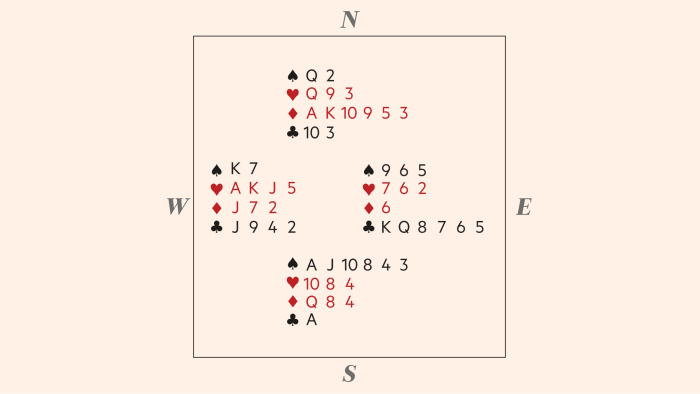
West is correct to pass throughout; to enter the auction with only 4-4 in the unbid suits would be reckless, especially with both opponents unlimited. West leads A♥; East discourages with 2♥. What does West know, and what should he do at trick 2?
West hopes for two heart tricks and K♠. From where might a fourth trick come? Recalling the auction will provide the answer. Dummy holds six diamonds; declarer raised to 4D, surely with three-card support. With West’s own three diamonds, this marks East with a singleton, and allows West to make a very rare play indeed: he leads dummy’s long suit.
West’s trump control of K♠ makes this the correct play. Declarer wins in dummy and takes the doomed trump finesse. West leads a second diamond for East to ruff and a heart comes back to West’s K♥. The diamond ruff is repeated to defeat the contract by two tricks.
Against decent opponents, declarer might anticipate the adverse ruff, but should he refuse the trump finesse and lay down A♠ and another? Unless trumps are 3-2 (with East holding the doubleton) it will not prevent the ruff and, if East holds K♠, declarer has just gone down in a cold contract.
Read Paul’s previous Bridge columns at ft.com/bridge-card-game
Comments